DC53 Steel
1 DC53 Steel Introduction:
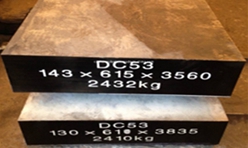
DC53 steel is a new general purpose cold work die and mold steel whose strength and toughness approach those of high-speed steels. DC53 steel, is an improvement over alloy tool steel D2 specified in Standard (JIS) G4404. It eliminates the disadvantages of insufficient hardness and toughness, resulting from high-temperature tempering found with D2, and is intended to replace D2 in use for general purpose and precision dies.
DC53 steel also has excellent machining characteristics and is well suited as a substrate for PVD surface treatments. DC53 steel can also be hot process CVD and TD (Thermal Diffusion) coated, however post heat treat is generally recommended.
We can provide more services:
1、Hardening and tempering
2、Vacuum heat treatment
3、Polished bright surface
4、Milling bright surface
5、CNC machine
6、Deep drilling
7、Cut into small pieces
8、Make it closer to the mold
Welcome to inquiry price from drawing
Cutting:
Precision cutting to standard dimensions
Custom cutting according to client specifications
Surface Grinding/Polishing:
Thickness tolerance: -0 to +0.1mm
Flatness: 0.01/100mm
Surface roughness: Ra ≤1.6 or Rz ≤6.3
2 Unique Characteristics:
- Higher hardness (62-64 HRc) than D2 after heat treatment.
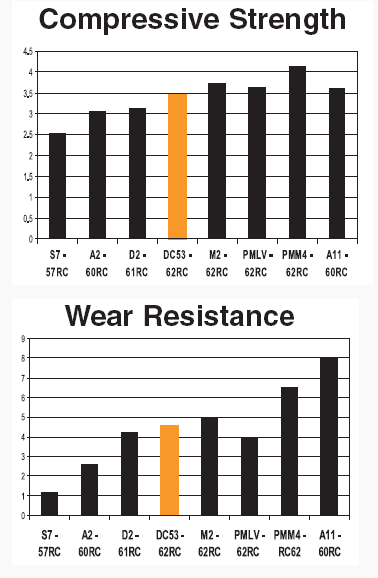
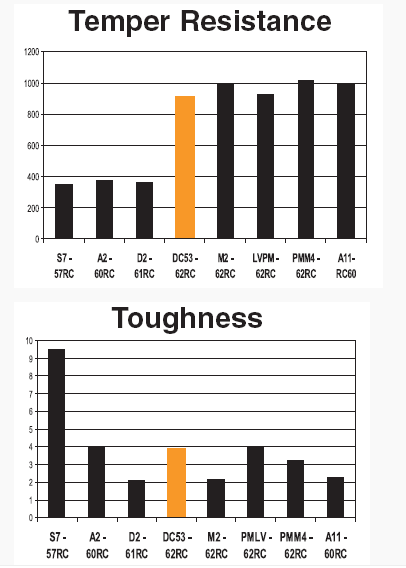
- Twice the toughness of D2 with superior wear resistance.
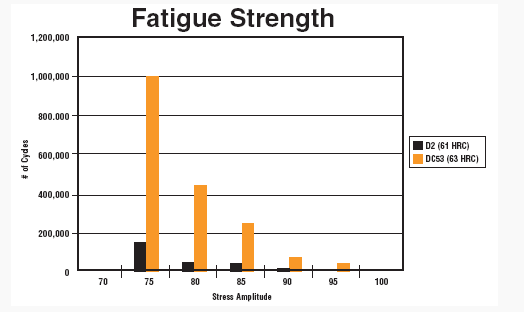
- Substantially higher fatigue strength compared to D2.
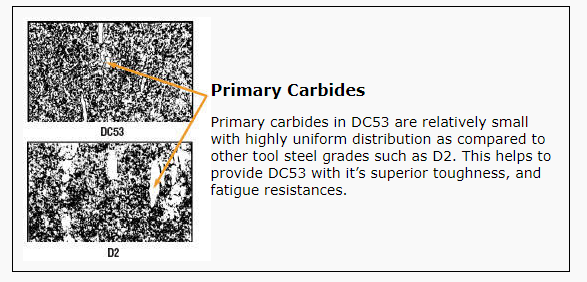
- Smaller primary carbides than D2 protect the die from chipping and cracking.
- Secondary refining process (DLF) reduces impurities.
- Machines and grinds up to 40% faster than D2.
- Less residual stress after wire EDMing.
3 DC53 Steel Applications:
- Stepped punch and press-punching dies
- Concrete sprayer parts, rotor plates
- Swaging dies and backers
- Dies for cold forging
- Thread-rolling circular dies
- Piercing punch
- Thread-rolling dies for heat-treated bolts
- Forming dies
- Stripper plates for lead frame blanking
- Gauges
- Screws for injection molding machines
- Plastic Molds
These properties are obtained through its chemistry as well as its unique manufacturing processes of ladle refinement, vacuum degassing and forging methods. DC53 also has excellent machining characteristics and is well suited as a sub-straight for PVD surface treatments. DC53 can also be hot process CVD and TD (Thermal Diffusion) coated however post heat treat is generally recommended.
4 Quality Standard:
ASTM A681 – 08 Standard Specification for Tool Steels Alloy.
5 Typical Chemical Composition(%)
| C | Si | Mn | Cr | Mo | Mo |
|---|---|---|---|---|---|
| 0.95 | 1.0 | 0.40 | 8.0 | 2.0 | 0.30 |
6 DC53 Steel HEAT TREATMENT:
DC53 Heat Treat – DC53 is only as good as the heat treatment it receives. The heat treat process can be broken down into two segments, Hardening & Tempering. DC53 is typically air hardened using a vacuum furnace however it can also be processed by using a gas or electric furnace with or without a controlled atmosphere when wrapped in stainless foil or salt bath hardened by immersing the part in high temperature salts.
- Welding: Lower minimum pre-and post – heating temperature than D2 reduces the incidence of weld cracking and simplifies welding. Low hardness decline in heat affected zone minimises any deterioration in performance.
- Hardening Vacuum Furnace: Pre-heat to 300-400oC and then to 800-850oC
allowing sufficient time to equalise. Raise to 1,020-1,040oC and allow soaking time - Quenching Vacuum Furnace:The high hardenability of this steel enables it to
be satisfactorally quenched in a vacuum furnace. - Surface Treatments:Surface treatments such as CVD, PVD, TD and Nitriding require the use of relatively high processing temperatures. While this can be a problem with standard D2, the higher through hardness of DC53 steel at elevated temperatures will allow these surface treatments to be used
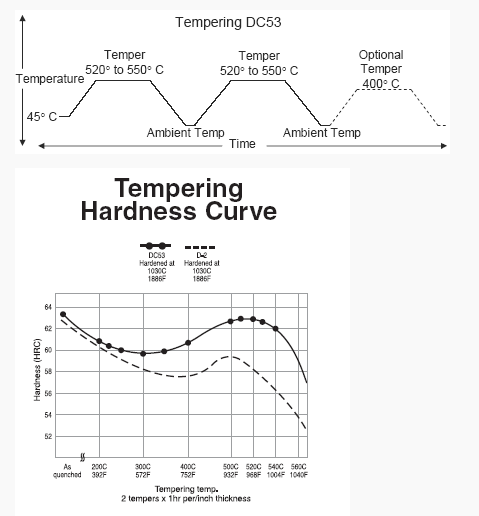
successfully. - Tempering:Double temper according to the hardness and toughness charts below. As with D2, a third temper at 400oC should be carried out to avoid any chance of any delayed grain growth and distortion. This is the preferred heat treatment for most applications as high hardness will be the primary consideration.Where maximum toughness is required, double temper between 200 and 300oC (depending on application). Note the material tempered at the lower temperature should not be subjected to subsequent high temperature processes such as PVD.
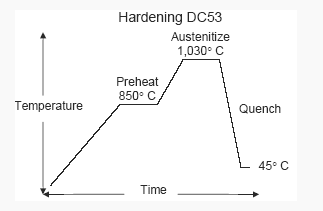
- Air Hardening – Air hardening DC53 is best accomplished under vacuum. First, preheat and hold at 800° C (1,475° F) to 850° C (1,560° F) until the part is uniformly heated and then increase the heat to 1,030° C (1,885° F) to Austenitize, otherwise known as soaking the tool. Austenitize 25 to 30 minutes per inch at temperature (to be safe, minimum austenitize time for smaller parts under 1 inch can be up to 1 hour) up to 4 inches thick in cross section and 10 to 25 minutes per inch for thickness over 4 inches before inert gas pressure quenching (Generally in nitrogen), to rapid cool with 2 times atmosphere pressure (2 bar) or high velocity equivalent. To be safe, longer times are acceptable while shorter times are not.Quench rates using 3 bar pressure or higher are not recommended due to the potential for distorting and the higher stress involved. The quenching phase converts the majority of the tool steel from the austenitic state to an un-tempered martensite condition. The part should then be immediately tempered once it has reached 45° C (120° F). Be sure to check hardness at this point to assure that the part has reached the desirable hardness if at least 64 HRC.
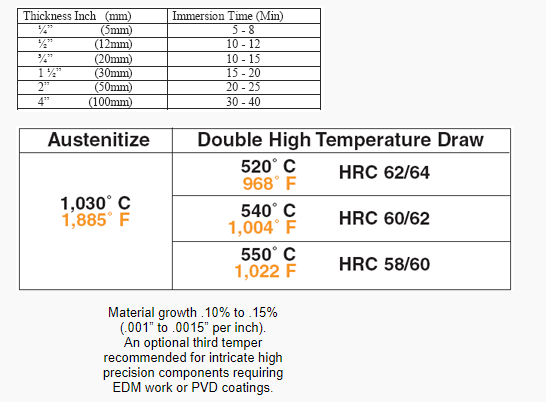
Salt Bath Hardening – Per-heat the part to 850° C (1,550° F) until uniformly heated. Austenitize in a molten salt bath at 1,030° C (1,885° F) for a minimum of 5 minutes. See chart below for details. Salt quench and then allowed to slow cool in still air to 45° C (120° F) to 65° C to (150° F) before tempering.
Tempering – Tempering is commonly performed in a non-atmosphere controlled convection furnace. The first temper should be conducted as soon as the part can be handled at about 45° C (120° F) to 65° C to (150° F). The part should be allowed to cool to ambient temperature between subsequent tempers.
To achieve HRC 60-62, temper DC53 twice at 540° C (1,005° F) for 60 to 90 minutes per inch in thickness in cross section. The minimum tempering time is 90 minutes. Temper twice at 520° C (970° F) for the same amount of time to achieve HRC 62-64. A hardness les than HRC 60 is not generally recommended for most punch and die components due to insufficient compressive strength typically needed for stamping applications. Applications requiring additional toughness can be double tempered at 550° C (1,020° F) to achieve HRC 58-60.
If size change or distortion of hardened DC53 due machining, grinding, applying surface treatments or wire EDM work is a concern in high precision applications, an optional third temper of 400° C (750° F) can be applied to the initial heat treat process. This final tempering temperature is high enough to temper the remaining un-tempered martensite, but not high enough to convert additional retained austenite resulting in a more stable structure. The third temper is typically not necessary if the tool has been hardened using the salt bath process.
Inspection – Conducting a hardness test after the heat treat process is complete is just one method used to measure the quality of heat treat. For additional quality assurance, it is also recommended that a precise dimensional measurement be taken from a given feature both before and after the entire heat treat process to assure that the proper amount of growth has taken place. Properly heat treated DC53 can be expected to grow approximately .1% to .1 ½% (.001” to .0015” per inch) of its original size before hardening. Shrinkage of the tooling can be a sign of problems in the hardening and or tempering process and is generally attributed to excessive amounts of retained austenite.
Vacuum Tempering – As when tempering most tool steels, vacuum tempering is a more difficult process to control than convection tempering and fluctuations in hardness results are to be expected. It should only be used when absolutely necessary and ideally be limited to smaller parts with a simple geometry.
Cryogenics – Freezing at 185° C (-300° F) between the first and second temper may also be beneficial to toughness however, specific data is not readily available. It is important to note that cryogenics should always be followed by a temper.
Forging – For special applications, DC53 can also be forged into many shapes. The temperature for forging is between 900° C (1,650° F) and 1,100° C (2,010° F). Annealing after forging in highly recommended to minimize stress in the part and assuring optimum heat treat response.
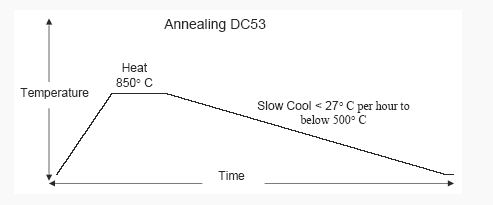
Annealing – DC53 can be annealed by uniformly heating the part to 800° C (1,475° F) to 850° C (1,550° F), and holding for 2 hours followed by a slow cooling at no more than 27° C (50° F) degrees per hour to until the it has dropped below 500° C (930° F). The part can then be removed from the furnace and allowed to continue to cool in still air to room temperature. If decarburization is a concern, annealing vacuum is recommended. In order to minimize size change, the pre-coating and post heat treat will need to be as similar as possible.
DC53 is well suited for supporting a wide variety of surface treatments which include Case Harden Nitride (Nitriding) which is diffused into the substrate tool steel or use the Physical Vapor Deposition (PVD), Chemical Vapor Deposition (CVD) and Thermal Diffusion (TD) otherwise known as Thermal Reactive
Diffusion (TRD) which are applied on the surface.
Surface treatments are either into the surface of the substrate tool steel which is otherwise known as case hardening or on the surface in the form of a surface coating. These treatments while very hard are also very thin making them nearly impossible to detect using a conventional hardness testing methods. When a combination of diffusion and surface coatings are used, a Vickers Micro Hardness Tester should detect a rise in surface hardness however, it will not reflect the hardness of the actual surface treatment alone.
Blanking Dies for Electric Home Appliance Components
| Working | Material Worked | Conventional Die Steel | DC53 | Approx. Dimensions (mm) |
| Cold pressing | Ni-based alloy (0.2 mmt) | D2
HRc58/59
Tempered at 510°C |
HRc62/63
Tempered at 520°C |
35tx100Wx250L |
| Evaluation | 5,000S | 25,000S | 5 times | |
Conducting a hardness test after the heat treat process is complete is just one method used to measure the quality of heat treat. For additional quality assurance, it is also recommended that a precise dimensional measurement be taken from a given feature both before and after the entire heat treat process to assure that the proper amount of growth has taken place. Properly heat treated DC53 can be expected to grow approximately .1% to .1 ½% (.001” to .0015” per inch) of its original size before hardening. Shrinkage of the tooling can be a sign of problems in the hardening and or tempering process and is generally attributed to excessive amounts of retained austenite.
7 Mill′s test certificate:
EN 10204/3.1 with all relevant data reg. chem. composition, mech. properties and results of testing.
