A2 Tool Steel
What is A2 Steel?
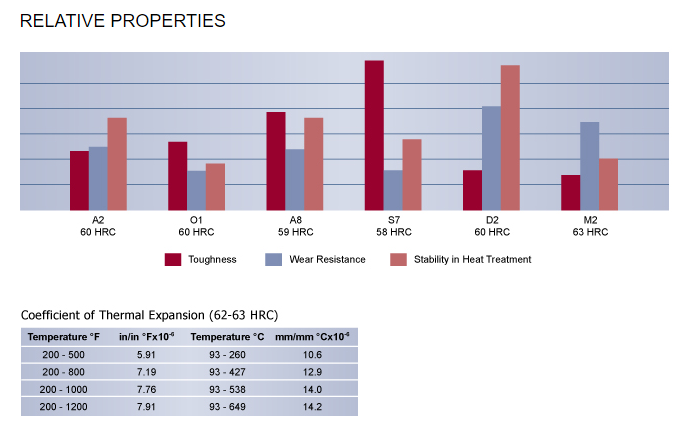
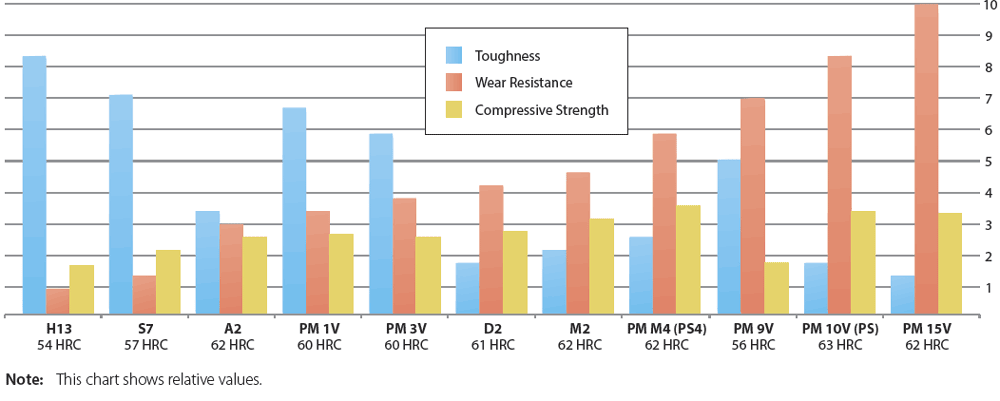
A2 is the most common grade of steel bar used to make tools for shaping metal, wood, and other materials. A2 medium-carbon chromium alloy steel is a member of the cold work tool steel group, designated by the American Iron and Steel Institute (AISI), which includes O1 low-carbon steel, A2 steel and D2 high-carbon high-chromium steel.A2 Tool Steel is a versatile, air-hardening tool steel that is characterized by good toughness and excellent dimensional stability in heat treatment. A2 is intermediate in wear resistance between O1 oil-hardening tool steel and D2 high-carbon, high-chromium tool steel. A2 provides an effective combination of strength and toughness, tool performance, price, and a wide variety of product forms.
We can provide more services:
1、Hardening and tempering
2、Vacuum heat treatment
3、Polished bright surface
4、Milling bright surface
5、CNC machine
6、Deep drilling
7、Cut into small pieces
8、Make it closer to the mold
Welcome to inquiry price from drawing
Cutting:
Precision cutting to standard dimensions
Custom cutting according to client specifications
Surface Grinding/Polishing:
Thickness tolerance: -0 to +0.1mm
Flatness: 0.01/100mm
Surface roughness: Ra ≤1.6 or Rz ≤6.3
What Is A2 Tool Steel Used For?
APPLICATIONS: Punches and dies, chuck jaws, cutting tools for woodworking, tooling for plastic injection, dowel pins, hammers, industrial knives, and gage A2 steel bar is available in a several forms, including square, round, and rectangular. This highly versatile material can be used for a wide variety of tools that require wear resistance, such as industrial hammers, knives, slitters, punches, tool holders, and woodworking cutting tools.
For inserts and blades, A2 steel resists chipping so that it lasts longer, often making it a more economical choice than high-carbon D2 type steel. It is often used for blanking and forming thread roller dies, stamping dies, trimming dies, injection mold dies, mandrels, molds, and spindles.
A2 tool steel properties
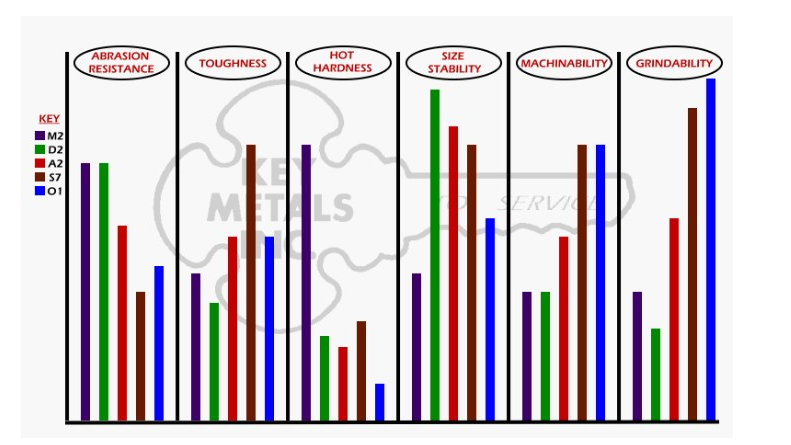
A2 is also an air-hardening tool steel but includes less than half the chromium (4.75 – 5.50%) and a bit less carbon (0.95 – 1.05%) than D2. It’s highly wear-resistant and moderately tough. Like D2, it is incredibly resistant to distortion during heat treating and is moderately machinable and grindable.
Popular hardness ranges for A2 run between 57 – 62 HRC with a yield strength range between 185 ksi – 230 ksi.
Relevant Steel Specification of A2 Tool Steel
| Country | USA | German | Japan | British |
| Standard | ASTM A681 | DIN EN ISO 4957 | JIS G4404 | BS 4659 |
| Grades | A2/T30102 | 1.2363/X100CrMoV5 | SKD12 | BA2 |
AISI A2 Tool Steel Chemical Composition & Other Equivalents
| ASTM A681 | C | Mn | P | S | Si | Cr | V | Mo | ||||||
| A2/T30102 | 0.95 | 1.05 | 0.40 | 1.00 | 0.03 | 0.03 | 0.10 | 0.50 | 4.75 | 5.50 | 0.15 | 0.50 | 0.90 | 1.40 |
| DIN ISO 4957 | C | Mn | P | S | Si | Cr | V | Mo | ||||||
| 1.2363/X100CrMoV5 | 0.95 | 1.05 | 0.40 | 0.80 | 0.03 | 0.03 | 0.10 | 0.40 | 4.80 | 5.50 | 0.15 | 0.35 | 0.90 | 1.20 |
| JIS G4404 | C | Mn | P | S | Si | Cr | V | Mo | ||||||
| SKD12 | 0.95 | 1.05 | 0.40 | 0.80 | 0.03 | 0.03 | 0.10 | 0.40 | 4.80 | 5.50 | 0.15 | 0.35 | 0.90 | 1.20 |
| BS 4659 | C | Mn | P | S | Si | Cr | V | Mo | ||||||
| BA2 | 0.95 | 1.05 | 0.30 | 0.70 | 0.035 | 0.035 | . . . | 0.40 | 4.75 | 5.25 | 0.15 | 0.40 | 0.90 | 1.10 |
Smelting Option
1 EAF: Electric Arc Furnace
2 EAF+LF+VD: Refined-smelting and vacuum degassing
3 EAF+ESR: Electro Slag Remelting
4 EAF+PESR: protective atmosphere Electro Slag Remelting
5 VIM+PESR: Vacuum induction melting
Forming Option
1 Hot rolling process
2 Hot Forging: Electro-hydraulic; High-speed-hydraulic; Oil-hydraulic; Precision-forging
Heat-treatment Option
1 +A: Annealed (full/soft/spheroidizing)
2 +N: Normalized
3 +NT: Normalized and tempered
4 +QT: Quenched and tempered (water/oil)
Suface Option
1 Black Surface
2 Grounded: Bright but rough ; Not precision
3 Machining for plate: Bright and precision; Little turning scar
4 Peeled/Turned: Bright and precision; Little turning scar
5 Polished: Very Bright and precision size; Not turning scar
Other Services
1 Cutting: Small pieces
2 CNC Machine: Produce as your drawing
3 Package: Bare/Nylon/Canvas/Wooden
4 Payment:T/T, L/C, O/A(request credit)
5 Transport:FOB/CFR/CIF/DDU/DDP (train/ship/Air)
ASTM A2 Tool Steel Mechanical Properties
Physical Properties
| Temperature | 68°F | 375°F | 750°F |
| (20°C) | (200°C) | (400°C) | |
| Density | |||
| lbs/in3 | 0.279 | 0.277 | 0.275 |
| kg/m3 | 7 750 | 7 700 | 7 650 |
| Modulus of elasticity | |||
| psi | 27.5 x 10⁶ | 26.9 x 10⁶ | 24.6 x 10⁶ |
| N/mm2 | 190 000 | 185 000 | 170 000 |
| Coefficient of thermal expansion | |||
| per °F from 68°F | – | 6.5 x 10⁻⁶ | – |
| per °C from 20°C | – | 11.6 x 10⁻⁶ | – |
Mechanical Properties of A2 Steels
| Properties | Metric | Imperial |
| Hardness, Rockwell C (as air-hardened (63-65 HRC average), 60-62 HRC at 205°C, 59-61 HRC at 260°C, 58-60 HRC at 315°C, 57-59 HRC at 370°C and 425°C and 480°C, 56-58 HRC at 540°C, 50-52 HRC at 595°C, 42-44 HRC at 650°C) | 64 | 64 |
| Bulk modulus (typical for steels) | 140 GPa | 20300 ksi |
| Machinability (based on carbon tool steel) | 65% | 65% |
| Shear modulus | 78.0 GPa | 11300 ksi |
| Poisson’s ratio | 0.27-0.30 | 0.27-0.30 |
| Elastic modulus | 190-210 GPa | 27557-30457 ksi |
PHYSICAL PROPERTIES
Density: 0.284 lb/in3 (7861 kg/m3)
Specific Gravity: 7.86
Modulus of Elasticity: 30 x 106 psi (207GPa)
(207 GPa W/m/°K)
Machinability: 70% of a 1% carbon steel
HEAT TREATING INSTRUCTIONS
HARDENING
Critical Temperature: Ac1: 1460°F (793°C)
Preheating: Heat at a rate not exceeding 400°F per hour (222°C per hour) to 1150-1250°F (621-677°C) and equalize. Then heat to 1300-1400°F (704-760°C).
Austenitizing (High Heat): Heat slowly from the preheat. Furnace or Salt: 1725-1750°F (941-954°C) Soak for 30 minutes for the first inch (25.4 mm) of thickness, plus 15 minutes for each additional inch (25.4 mm).
Quenching: Air, pressurized gas, or interrupted oil to 150-125°F(66-51°C).
Note: Sizes over 3 inches (76.2mm) in cross section may not achieve full hardness by cooling in still air. It is usually necessary to increase the quench cooling rate between 1400 to 900°F (760 to 482°C) by using an air blast, pressurized gas, or an interrupted oil quench. For the oil quench, quench until black, about 900°F (482°C), then cool in still air to 150-125°F(66-51°C).
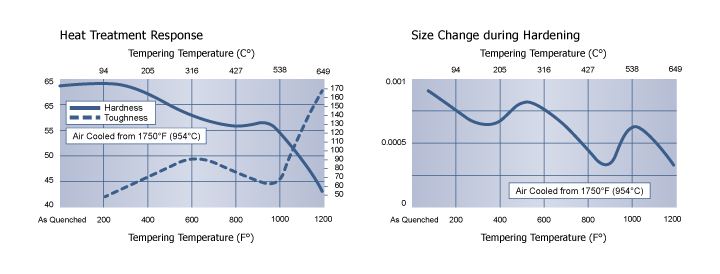
Tempering: Temper immediately after quenching. Hold at temperature for 1 hour per inch (25.4 mm) of thickness, 2 hours minimum, then air cool to ambient temperature. The typical tempering range is 350 to 500°F (177 to 260°C).
To minimize internal stresses in cross sections greater than 6 inches (152.4 mm) and to improve stability in tools that will be EDM’d after heat treatment, a soaking time of 4 to 6 hours at the tempering temperature is strongly recommended.
| Tempering Temperature°F | Rockwell C |
| 300 | 62 |
| 400 | 60 |
| 500 | 58 |
| 600 | 56 |
| 700 | 56 |
| 800 | 56 |
| 900 | 56 |
| 1000 | 55 |
| 1100 | 50 |
| 1200 | 43 |
| 1300 | 34 |
Cryogenic Treatment: Some prefer to do cryogenic treatment as an extension of the quench from the austenitizing treatment. Others prefer to cryogenically treat after tempering.
ANNEALING
Annealing must be performed after hot working and before re-hardening.
Heat at a rate not exceeding 400°F per hour (222°C per hour) to 1550°F (843°C), and hold at temperature for 1 hour per inch (25.4mm) of maximum thickness; 2 hours minimum. Then cool slowly with the furnace at a rate not exceeding 50°F per hour (28°C per hour) to 1000°F (538°C). Continue cooling to ambient temperature in the furnace or in air. The resultant hardness should be a maximum of 235 HBW.
Nitriding
Nitriding will give a hard diffused surface layer which is very resistant to wear and erosion, and also increases corrosion resistance. Nitriding AISI A2 steels in ammonia gas at a temperature of 975°F (525°C) gives a A2 steel surface hardness of approx. 1000 HV1.
| Nitriding temperature |
Nitriding time | Depth of case, approx |
||
| °F | °C | hours | in. | mm |
| 980 | 525 | 20 | 0.008 | 0.2 |
| 980 | 525 | 30 | 0.012 | 0.3 |
| 980 | 525 | 60 | 0.016 | 0.4 |
2 hours nitrocarburizing treatment at 1060°F (570°C) gives a surface hardness of approx. 900 HV1. The case depth having this hardness will be 0.0004–0.0008″ (10–20 µm).
Physical Properties
The following table shows the physical properties of A2 tool steels.
| Properties | Metric | Imperial |
| Density | 7.86 g/cm3 | 0.284 lb/in3 |
| Melting point | 1424°C | 2595°F |
Mechanical Properties
The mechanical properties of A2 tool steels are displayed in the following table.
| Properties | Metric | Imperial |
| Hardness, Rockwell C (as air-hardened (63-65 HRC average), 60-62 HRC at 205°C, 59-61 HRC at 260°C, 58-60 HRC at 315°C, 57-59 HRC at 370°C and 425°C and 480°C, 56-58 HRC at 540°C, 50-52 HRC at 595°C, 42-44 HRC at 650°C) | 64 | 64 |
| Bulk modulus (typical for steels) | 140 GPa | 20300 ksi |
| Machinability (based on carbon tool steel) | 65% | 65% |
| Shear modulus | 78.0 GPa | 11300 ksi |
| Poisson’s ratio | 0.27-0.30 | 0.27-0.30 |
| Elastic modulus | 190-210 GPa | 27557-30457 ksi |
| SIZE O.D. IN INCHES | AVG. WALL THICKNESS IN INCHES | APPROX. WT. PER FT. IN LBS. |
| 3/4 x 1 1/2 | .125 | .588 |
| 1 x 1 1/2 | .125 | .662 |
| 1 x 2 | .125 | .810 |
| 1 1/2 x 2 | .125 | .957 |
| 1 1/2 x 2 1/2 | .125 | 1.103 |
| 1 3/4 x 2 1/4 | .125 | 1.103 |
| 1 3/4 x 3 | .125 | 1.323 |
| 1 3/4 x 3 1/2 | .125 | 1.470 |
| 1 3/4 x 4 | .125 | 1.617 |
| 1 3/4 x 4 1/2 | .125 | 1.764 |
| 1 3/4 x 5 | .125 | 1.911 |
| 1 3/4 x 6 | .125 | 2.250 |
| 2 x 3 | .125 | 1.397 |
| 2 x 4 | .125 | 1.690 |
| 2 x 5 | .125 | 1.985 |
| 2 x 6 | .125 | 2.279 |
| 2 x 6 | .250 | 4.410 |
| 2 x 8 | .125 | 2.925 |


