Improvement Measures for Transverse Charpy Impact Strength of Hot Work Tool Steel 1.2344
As a high-quality heat-resistant tool steel, 1.2344 is known for its uniform composition, good hardenability, excellent machinability, high toughness, hardness, low-temperature wear resistance, and high-temperature fatigue resistance. It is particularly widely used in die-casting molds, with applications spanning the automotive, electronics, machinery, and construction industries. High-quality 1.2344 tool steel requires high transverse impact toughness; good isotropy ensures that the mold can withstand impact and compression loads in all directions during service.
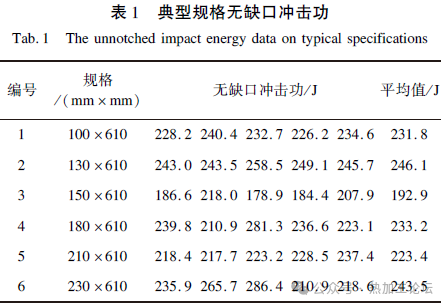
Similar to H13, 1.2344 belongs to the Cr-Mo-V system of tool steels, with similar design compositions and performance requirements. According to NADCA #207-2003 standards, the minimum V-notch impact strength for premium tool steels should not be less than 14J, corresponding to a minimum non-notched impact strength of 300J in the customer market. Currently, the average non-notched impact strength of Zhangxuan Technology’s production of high-quality 1.2344 tool steel is around 230J, failing to meet the standard and customer requirements. To improve the impact strength, a full-process technological optimization was implemented.
Non-notched Impact Strength Testing:
According to NADCA #207-2003 standards, non-notched impact strength samples were taken from the center of the forging materials, ultimately ground to a size of 15mm x 15mm x 55mm. After soaking at 1020°C for 30 minutes, oil quenching was performed. Subsequently, the sample was heated to 585°C for tempering for 2 hours, air-cooled to room temperature, reheated to 585°C for a second tempering for 2 hours, and finally tested for impact toughness at an ambient temperature of 20±3°C.
Typical Batch Impact Strength Specifications are shown in Table 1.
Principle Analysis:
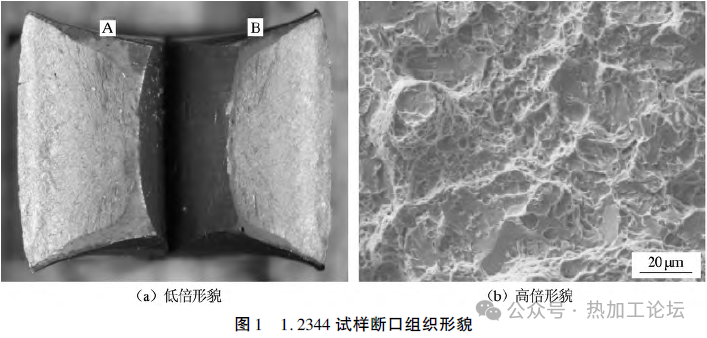
Analysis of typical samples with low impact strength values was conducted to explore possible factors affecting the impact strength. The fracture morphology of the samples is shown in Figure 1.
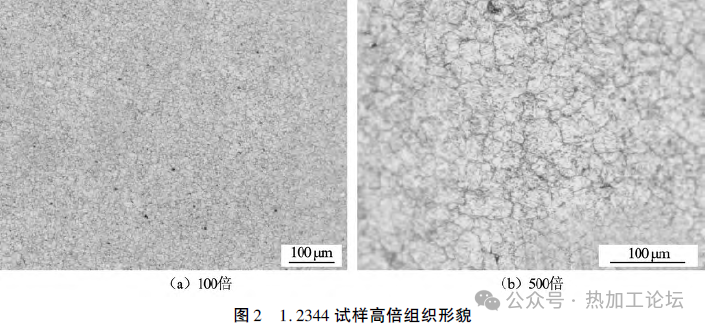
Under low magnification, the fracture surfaces appeared relatively flat. Scanning electron microscopy (SEM) analysis showed that the fracture sources exhibited varying degrees of intergranular fracture characteristics. No large inclusions were observed, but there was a larger area of intergranular fracture regions and a certain number of dimple-like morphologies. The microstructure of the samples under SEM at 100x and 500x magnifications is shown in Figure 2.
From Figure 2(a), it can be seen that there were a certain number of eutectic carbides present in the samples. Figure 2(b) shows that samples with low impact strength exhibit obvious secondary carbides arranged in chain-like or network patterns along the grain boundaries, with larger primary carbides observed locally. It is inferred that these carbides are inherited from the ESR ingots and have not been fully melted and diffused during the high-end homogenization process. Incomplete deformation during forging or single-directional forging did not completely break them down.
Generally speaking, the main reasons affecting the impact toughness of steel include the following points:
(1) Secondary carbide precipitation along grain boundaries is one of the main reasons for low impact toughness. Studies show that the main carbides in the steel are V8C7, Cr23C6, and Cr3C2(Cr2VC2). Due to insufficient heating during forging and improper post-forge cooling, these carbides tend to accumulate along the grain boundaries, weakening the grain boundary and reducing the impact toughness of the steel.
(2) Li Yongdeng et al. pointed out when studying the cause of insufficient transverse impact strength in H13 steel modules that inclusions in the steel can cause unevenness in the microstructure. These inclusions do not deform plastically with the metal, making them likely to become stress concentration points where cracks initiate under load, driving crack propagation and disrupting the continuity of the metal matrix, thereby lowering the toughness of the steel.
(3) Additionally, certain elements also affect the impact toughness. Silicon is an effective element for solid solution strengthening of ferrite but can reduce the toughness and plasticity of the steel to a certain extent. Adjusting the silicon content appropriately to a range below 0.8% to 1.2% can benefit the improvement of material toughness while meeting the composition requirements of the steel. Vanadium forms carbides more readily than chromium and molybdenum and rarely dissolves into the iron solid solution. While vanadium carbides provide good thermal hardness, increase tempering stability, and enhance secondary hardening effects, they can also lead to banding segregation, which cannot be completely eliminated by high-temperature diffusion. Therefore, reasonably reducing the vanadium content can inhibit the precipitation of large primary carbides sized between 10 to 30μm, significantly improving transverse impact properties.
Optimization Measures:
3.1 Optimization of Metallurgical Composition Design: Based on the mechanism of Si and V elements in the material, the corresponding elemental compositions were optimized during the metallurgical process, as shown in Table 2.
3.2 Optimization of Metallurgical Process: Improving material purity, reducing harmful elements P, S, O, N, and inclusion contents significantly enhances the impact toughness of high-quality mold materials. Reducing sulfur element segregation at grain boundaries can strengthen grain bonding, thereby improving the impact toughness of the steel. Oxides and nitrides in the steel, which do not deform plastically, distribute along the processing direction during pressure forming, severely disrupting the uniformity of the steel matrix and significantly reducing its toughness. Therefore, improving the metallurgical quality of the forging raw materials is an important measure to enhance the material’s impact strength. The use of EAF + LF + VD triple-process strictly controls harmful elements, gases, and inclusions in the steel, as shown in Figure 3.
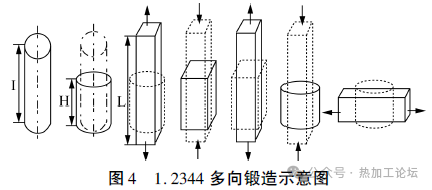
3.3 Multidirectional Forging Large Deformation Process: Research indicates that multiaxial forging large deformation not only breaks up coarse as-cast structures and unstable eutectic carbides, reduces the impact of banding segregation, decreases the distribution of pearlite chains in annealed structures, but also reduces the number of lamellar and acicular martensites, allowing spheroidal carbides to be uniformly dispersed in the matrix with smaller average particle sizes. The multidirectional forging process involves completing at least one-third of the upsetting and drawing deformation in the X, Y, and Z directions in space, effectively deforming the coarse dendrites of the as-cast structure, as shown in Figure 4.
Additionally, large deformation through multiaxial forging improves the microstructure of the material, not only enhancing the impact strength but also improving the isotropic properties of the material, achieving uniform properties in all directions. Research shows that large deformation under the same process conditions can increase the non-notched impact strength by about 23% compared to small deformation, as shown in Figure 5.
3.4 Optimization of Heat Treatment Cooling Methods: Research indicates that the recrystallization temperature of 1.2344 is between 650 and 850°C, as shown in Figure 6. If the final forging temperature is too high and the cooling rate after forging is lower than the critical rate, pearlite and bainite transformation easily occur, accompanied by the precipitation of secondary carbides along the grain boundaries in chain-like or network patterns, affecting the impact toughness. Rapid cooling of the forging material ensures that the average temperature of the material falls below the recrystallization temperature range, promoting martensitic transformation and effectively inhibiting the precipitation of secondary network carbides.
Therefore, it is necessary to strictly control the final forging temperature. Firstly, matching the forging deformation with the temperature, the final forging temperature must not exceed 850°C, ensuring effective forging deformation occurs throughout the forging temperature range. Post-forging cooling uses rapid water cooling to enhance the cooling rate of the core of the forging material, avoiding the precipitation of secondary carbides in the core, and improving the uniformity of the internal and external structure. The cooling rate is controlled at 15°C/min, with the forging material placed vertically on a custom-made rack and rapidly immersed in water for uniform and rapid cooling. Post-forging materials undergo ultrafine spheroidizing annealing. After optimization, the forging material is subjected to rapid water cooling after forging, transported to the water cooling area within 2 minutes, immersed in water for 5 minutes, removed for 1 minute to dry, and if the temperature is above 400°C, re-immersed for about 3 minutes, finally achieving rapid water cooling with the surface temperature of the forging material not exceeding 400°C.
Experimental Results:
4.1 Metallurgical Process: Table 3 lists the average distribution of key elements in the forging raw materials after optimizing the metallurgical process.
From Table 3, it can be seen that after optimizing the metallurgical process, the Si content decreased by an average of 0.16%, and the V content decreased by an average of 0.12%. Appropriately optimizing the content of segregating elements is beneficial for reducing the degree of segregation in the ingot. The O, N, and S contents have significantly decreased, reducing brittle cracking caused by oxide, sulfide, and nitride inclusions. Thus, improving the purity of the molten steel is conducive to obtaining higher impact strength. Hydrogen content changes are minor and have no significant impact on impact strength. As shown in Figure 7, after optimizing the metallurgical process, no significant Class B alumina or Class C silicate inclusions were found, only a small amount of Class A fine sulfur inclusions and Class D fine spherical oxide inclusions, rated at 0.5 level, significantly fewer than the 1.0 and 1.5 levels before optimization, indicating a substantial improvement in the purity of the ingot.
4.2 Banding Segregation and Annealed Structure: After optimizing the metallurgical process, forging method, and post-forging cooling methods, six batches of flat steel modules were randomly selected, with their banding and annealed structure ratings shown in Table 4.
From Table 4, it can be seen that the banding segregation is all at SA2 level or above, and the annealed structure ratings are all at AS5 level or above after process optimization, meeting the rating requirements for high-quality tool steel banding and annealed structure. The effect of process optimization is significant. Typical banding segregation of forged flat steel is shown in Figure 8.
From Figure 8, it can be seen that after multiaxial forging, there is no obvious banding segregation, reducing the impact of eutectic carbides on the continuity of the matrix, avoiding the risk of cracking under impact loads and thermal stresses, and improving the toughness of the material. The better the dendrite fragmentation effect of multiaxial forging deformation, the fewer the retained strip-like carbides at the grain boundaries, and the more uniform the size and distribution of the carbides, with particles appearing round and finely dispersed, evenly distributed in the ferrite matrix.
4.3 Impact Performance: After process optimization, six batches of flat steel of different specifications were randomly selected for transverse non-notched impact performance analysis, with the results shown in Table 5. The comparison of non-notched impact strength before and after process optimization is shown in Figure 9, and the analysis of the fracture surfaces of high-impact strength samples is shown in Figure 10.
From Table 5, it can be seen that after process optimization, the average transverse non-notched impact strength reached over 300J, with individual measurements slightly below 300J but all above 290J. Considering allowable deviations, it can be concluded that the non-notched impact strength can be stably controlled above 300J after process optimization. From Figure 9, it can also be seen that the impact strength of the same specification products is significantly improved after process optimization, with an average increase of 80J. This indicates that after process optimization, the purity of the molten steel is improved, the quantity and size of brittle inclusions and eutectic carbides are significantly reduced, reducing internal stress cracking caused by material inclusions, weakening the degree of banding segregation, and inhibiting the precipitation of secondary carbides in chain-like or network patterns, significantly improving the uniformity of carbides in the annealed structure, achieving good dispersion of carbide spheroidization, stabilizing the bonding force between grain boundaries, and significantly improving the impact toughness of the material. Using ZEISS EVO10 scanning electron microscopy to analyze the fracture surfaces of high-impact strength samples, it can be seen from Figure 10 that although there is still intergranular fracture, the number is significantly reduced compared to the low-impact strength samples in Figure 1(b), and the dimples are finer and more numerous, improving the impact toughness of the material.
Conclusion:
(1) For high-quality tool steel with high requirements for impact strength, controlling the content of segregating and harmful elements can significantly improve the purity of the molten steel, reduce the degree of segregation, minimize the disruption caused by inclusions to the continuity of the matrix, and improve the impact strength. Segregating elements Si and V should be controlled below 0.90%, harmful element P below 150 ppm, S below 0.003%, gas content O not exceeding 20 ppm, N not exceeding 130 ppm, and H not exceeding 2 ppm.
(2) Large deformation forging in X-Y-Z three-dimensional directions uniformly breaks up the dendrites of the material, resulting in smaller-sized eutectic carbides, eliminating coarse grains and segregation bands, achieving a more uniform and dispersed pearlite structure, with banding stable at SA2 level or above, potentially increasing transverse impact strength by about 20%.
(3) Rapid water cooling after forging can avoid the weakening of grain boundaries caused by the precipitation of secondary carbides due to high final forging temperatures, preventing the formation of AS9-level or higher structures containing chain-like or network carbides, keeping the structure stable at AS5 level or above, thus enhancing impact performance.
(4) After process optimization, the average non-notched impact strength can reach nearly 325J, an increase of 80J compared to before process optimization, meeting the impact strength standard requirements for high-quality hot work tool steel 1.2344.


